| Dromed Page A collection of dromed notes and things: Hit Yes to crash, No to crash, and Cancel to crash. |
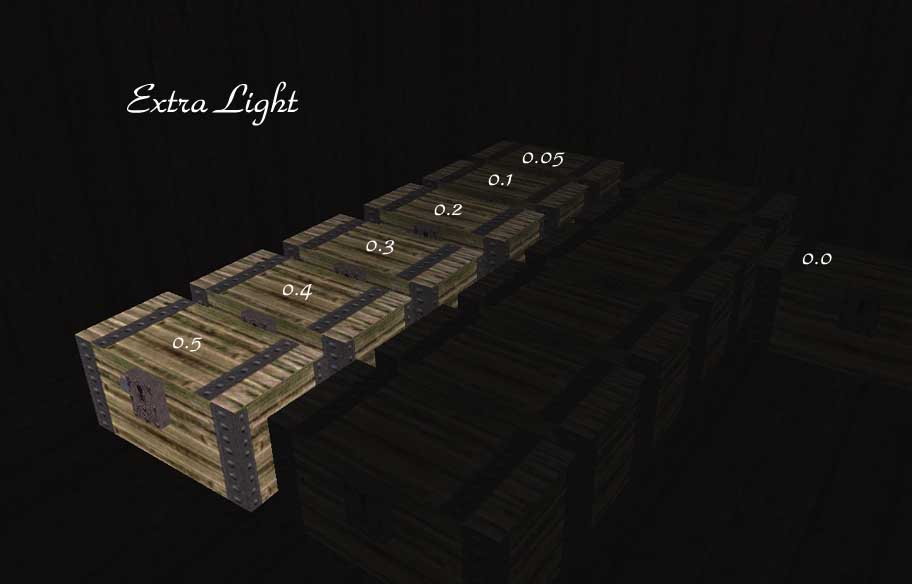 |
| What Renderer>ExtraLight does |
| Written notes to help me remember how to do things: |
| Books and Scrolls: (close Dromed) First open Darkloader, click on Original Thief 2, and click Install Only. This resets the Thief folders. Now, in the Thief root directory, make a folder called Books. Whenever you're going to make a book or scroll, you'll need to make a file in here called whatever.str. Always ".str" So make a new Wordpad document, rename it to .str, and write it like this: Page_0: "blah, blah, blah... begin and end it with quotation marks, like this." Page_1: "blah, blah, blah... begin and end it with quotation marks, like this." Page_2: "blah, blah, blah... begin and end it with quotation marks, like this." You need quotes at the beginning and end of each page, but NOT before Page_0. - Open Dromed, load the mission... Editors, Object Hierarchy, Add: physical> Household> Book physical> Household> Scroll physical> Decorative> Plaque Go to properties, Add, Book> Text, and type whatever.str. Now Add, Book> Art, and type in parch, to make it visible. You have many varieties of Art style. Here they are: Add, Book> Art: ledger ledger2 parch parch2 parch3 pbook pbook2 plaque graveD10 stoned4 |
| Loot: Make a loot object. To adjust its worth, go to properties, Add, Dark Gamesys, Loot, and adjust however you want. To make Loot in Footlockers, Safes, or other containers: Make the container. Make Loot, and put it in a blueroom. Now just link the Container to the Loot with a "Contains" flavor. You can't link several containers to one loot, so Each container needs it's own Loot counterpart. |
| AI Patrol Routes: First make the AI a patroller. Go to the AI's properties, click Add, AI, Ability Setting, Patrol: Does Patrol, and check the box. If you want the AI to patrol to random patrol points: ...Ability Setting, Patrol: Random Sequence. To create a patrol point, go to Object Hierarchy, fnord, Marker, TrolPt. Guards always pick the nearest patrol route, so put the patrol point very near or inside the guard. Now clone the patrol points and put them wherever you want. Try not to put anything between them, or the AI will have to bump into things and walk around them, which looks goofy. Linking Patrol Points. Harder way: Patrol points must be linked in succession, and the last must be linked with the first. You can link either forward or backward. (next paragraph has a better way) So first, select each patrol point and write down their numbers in order from first to last. Select the first point (usually closest to the AI), and open Links, then Add. In Flavor put AIPatrol. In From: # of selected patrol point. In To: # of next patrol point. Note: The Next patrol point now has a backward link. EASIER way: Select the first patrol point, Shift-Select the next, then go to the Tools Menu: Link Group AI Patrol. Do this with EACH patrol point, shift-clicking the next. That's it. |
| To custom-name an object: 1. Make a directory Thief2\Strings and a directory Thief2\Strings\english (optional). 2. Open up Thief2\res\strings.crf and copy Objnames.str to the directory you just made. 3. In for example notepad add something like this "Name_Corpse1: "(insertnamehere)"[return]" at the end of the file. 4. Give him the property Inventory > Object Name: "Name_Corpse1". That's it. |
| Arrows that Stick: are caused by an arrow having the property -> DeathStage: 12 To fix it, you need to change the arrow's properties from DeathStage: 12, to DeathStage: 0. Don't delete the DeathStage: 12 property as it will probably come back. Simply click on the "Add" button and replace it with DeathStage: 0 (you can find it under Game>Damage Model>DeathStage) |
| Water: Make a brush (any brush) and make it "Fill Water." (or flood to fill up an area without cutting it out) Now you need to Flow Brush it (Room brushing for water). Create a Flow Brush around the water, like a room brush. At the bottom of dromed, click on Edit Group. Under texture, either type in bl or gr, for blue water or green water. (everything else on that palette is for water flow/current, etc.) Click Ok, and Update World at the bottom. Now the water textures need a blueroom, or you'll lose them. Create a blueroom, open the texture palette, and paint the blueroom with blin and blout. |
| Lockpicking: Make a door or lootbox of some kind. Properties>Engine Features>Locked and check the box. Properties>Dark Gamesys>PickCfg PickCfg properties: LockBits 1: what type of lockpick? 1 is squaretooth, 10 is triangle, 11 is whichever, and 0 is none. Pins 1: Lock complexity. Keep this relatively low, or picking may take a while. 1-10 is a basic scale. 20 is usually extreme. TimePct 1: How much time, compared to the standard cycle, which is 3 seconds. 100% makes it double, 6 seconds. - LockBits 2: here begins the second lock cycle, when you change pick, so make sure LockBits 2 and 3 is different from #1. Ignore Flags. |

|
 |