VHOT Attachment for door handles and particle effects.
Axles for switches.
J.Knez (Schwaa)

Download this entire tutorial
Download the cabinet object files
Creating a custom door:
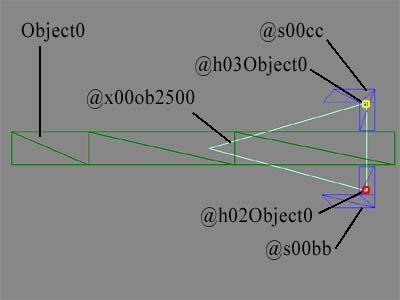
In a 3d modeling Program name your door objects like this. This is to make a door handle
rotate.
door= object0
Handle1= @s00bb
VHot1= @h02object0
Handle Axle= @x00ob2500
Handle2= @s00cc
VHot2= @h03object0
Create your door in Dromed under the appropriate door style.
Creating a Particle Attachment:

Torch VHOTS:
torch body = Candle
VHOT #1 = @h01Candle
VHOT #3 = @h03Candle
Most torches in Dromed have 2 VHOTS although this pic only shows one. Thief uses one VHOT for
a flame particle and one for a smoke particle. You can get by with attaching multiple particles
to each VHOT. Maximum number of VHOT's per object is 3.
Place these VHOTS in the middle of the flame, (I didn't put a flame object on the pictured candle)
attach particles in Dromed:
~Particle attachment.(Yes the particle owns the VHOT.)
Data:{VHOT;3;N/A;0}
This link would attach one particle type to VHOT 3
Creating a Secret Lever:
Switches are slighty different, they don't contain VHOTs. See the Candle pic.
For a switch you need three parts. It gets more complex if you want to add many switches
to an object like a control panel, see the next section - Multiple Joints per Object.
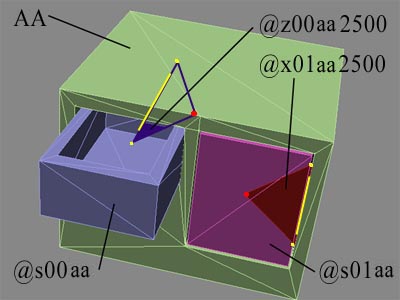
base = aa
Handle = @s00bb ([@s,zero,zero,ff] make sure it's
zeros and not o's)
axle (r) = @x00aa2500 for a Rotating joint
axle (t) = @z00aa2500 for a Translating joint
Basically what you have in 3d program is three parts, the base, the switch and the axle.
Name them as above, now its time to decide what kind of axle you want and where you
want it to move. Your two axle types are translating (sliding) and rotating. You also
have to decide the plane it travels in. Up and down or left to right.
When you figure that out create your axle. Some 3d programs allow you to make a two
point line (Anim8or), others like 3D Studio MAX will only let you make a three point line, either works,
but the three point line takes a little .e file editting.
The candle switch has a rotating axle. If its up/down then the axle line will need to
run right to left through the point of rotation. If you have to make a three point
line make the third point out of line with the other two. In the above pic, the yelow dots form
the axle path, the red dot is neccesary to export from 3ds, it will have to be removed from the .e file.
A button has a translating axle (see the drawer axle below), make your axle path in line with how you want the
button to move. One end of the line in the middle of the button, and the other end
of the line in the middle of where you want the button to stop. Again, the third point
(if neccessary) should be in different planes than the two important points.
If you use 3DSMax, make the triangle of points and extrude them. don't make the triangle
have any depth, just click the extrude button, weld the vertices (you now have 6, you
want 3) and delete one of the two faces.
Make sure you have it the correct size, and centered. For a switch make sure its in the
off position!!!
Export the .3ds file and convert to .e with 3dstoe.exe.
If you had to make a triangle axle (3DMax) open up the .e file with notepad and look for
these lines of text :
BEGIN "@x00aa2500"
POINTS{
0.406608,0.099621,-0.039791;
-0.394412,0.095121,-0.039791;
-0.376544,0.086733,-0.044444;
}
PARTS{
4,N,0, 3,(1,2,4);
}
PART MAPPING{
0,(0.000500,0.995472),(0.999501,0.999500),(0.494387,0.000500);
}
Delete the highlighted stuff, this is the extra point of the axle path and the triangle parts,
leaving you with only a line between two points. Make sure you delete the correct point,
it's not always the third one. These numbers are XYZ coordinates in space, that's why I said to
make the third point out of line, makes it easier to tell which one it is.
Obviously the first two are alot closer in line with each other so I knew the third was the
one to get rid of.
Then save the .e file, convert to bin (with BSP.exe) and try out your new model in Dromed,
look at a switch,button or container properties to see how to setup the axle movement.
Multiple Joints per Object:
 Objects in Thief can have multiple joints. This comes in handy for containers like a footlocker. One joint is
used for the lock (set lock props in Dromed) and one joint is used for the lid. It can also be used to make a cabinet
have multiple doors and or drawers. Some objects like clocks have multiple joints also, the grandfather clock in Thief II
has 3 joints, one for the hour hand, one for the minute hand, and one for the pendulum.
Objects in Thief can have multiple joints. This comes in handy for containers like a footlocker. One joint is
used for the lock (set lock props in Dromed) and one joint is used for the lid. It can also be used to make a cabinet
have multiple doors and or drawers. Some objects like clocks have multiple joints also, the grandfather clock in Thief II
has 3 joints, one for the hour hand, one for the minute hand, and one for the pendulum.
Although objects can have multiple joints, they can't always be used at once, here are some conditions of use to take into consideration:
Footlockers can use 2 joints at once. One for the lock, one for the lid. The lock props are set in Dromed under Tweq:Lock,
the lid props are set under Tweq:Joints. The condition is that each joint is set on the base model, meaning the lock has to be
fixed to the base, it can't move with the lid.
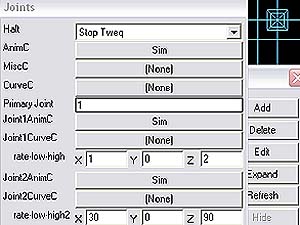
Containers like the cabinet (see pic above- click to download) can have up to 6 joints, either doors or drawers. The exception is that only one can be
set to open in Dromed per concrete object. You can however make an object with multiple joints so that each room the player goes in that has the same cabinet,
a different drawer or door can open. Not necessary but it can help add variety. See the pic below for an example, in this instance joint one is set to open.
Objects like the clock can have multiple joints that work all at once, but they all have to move at once, and none can be frobbed like a switch or drawer.
Multiple Joints per Sub-Object
Here's a quick little guide to objects with multiple joints. You can make objects with single or double jointed sub-objects. Objects can have a total of
6 different joints.
It's actually fairly easy so give it a try.
First you need to figure out what model would need several joints. Thief 2 has a pumper2 model which is just a pump with two arms. Each arm has a sub arm attached. This gives four joints in all. I'll explain how it is built:
Names:
Pumper: the base model. This is a box, could be just about anyshape. Even just a vertice if you want the whole object to move.
----------
@s00aa:The first sub-object. It will be attached to the base via an axle. It will attach to axle 00.
@x00pu0000: The first axle. 00 will become joint 1 in Dromed Tweq settings. The pu attaches it to the base obj, the 00 attaches it to the sub-obj.
----------
@s01bb:The second sub-object. It will be attached to the first sub-obj via an axle. It will attach to axle 01.
@x01aa0000: The first axle. 01 will become joint 2 in Dromed Tweq settings. The aa attaches it to the sub0obj @s00aa, the 01 attaches it to the second sub-obj, bb.
----------
@s02dd:The second sub-object. It will be attached to the first sub-obj via an axle. It will attach to axle 01.
@x02pu0000: The 3rd axle. 02 will become joint 3 in Dromed Tweq settings. The pu attaches it to the base obj, the 02 attaches it to the sub-obj.
----------
@s03ee:The second sub-object. It will be attached to the 2nd sub-obj via an axle. It will attach to axle 03.
@x03dd0000: The first axle. 03 will become joint 4 in Dromed Tweq settings. The dd attaches it to the sub0obj @s02dd, the 03 attaches it to the 4th sub-obj, ee.
So what we have above is a base (pumper) that has 2 axles attached (@x00pu0000 and @x02pu0000).
Each of these axles has a sub-obj attached (@s00aa and @s02dd respectively)
Each of these sub-objs has an axle at the end (@x01aa0000 and @x03dd0000 respectively) Notice that the name [aa] of the axle matches the obj it's attached to).
And again each of these axles has a sub-object attached (@s00bb and @s03ee) Notice that the number of the sub-obj is the same as the axle it attaches to.
==============
2 things to pay attention to:
1-The axle numbers go in order starting always at 00, 01, 02, 03... There are 6 joint slots in the tweq settings so theoritcally an obj can have up to 6 joints. I haven't had luck making more than 2 joints in a row yet. So you could have any combo of up to 6 joints. (5 jointed sub-obj and one 2 joint sub-obj like above, whatever)
2-The axle/sub-obj names follow an alphebetical order. The letters can be anything. I started with aa since that's the beginning of the alphabet.
Notice that the sub-obj of obj aa is bb. That means it will follow along with the aa joint. Say aa is your shoulder, if you move it up you'll want your elbow (BB) to follow.
Now notice that on the second set of arms I used dd and ee. This breaks the chain so arm 2 doesn't follow arm one. But sub-obj ee does follow sub-obj dd.
================
That's it, maybe I'll release an obj soon so you can look at it closer, or open up pumper2.bin and take a look. They used higher letters in pumper2, rr, ss , ect... but it doesn't matter.
Any ideas on a good multi-joint obj to make? Something that tilts and swivels at the same time?
Trouble Shooting:
Explanation of axle object names:
The @ is fairly self explanitory. The axle is @ (at) the base object.
The X or Z stands for the axle type, rotating or translating.
The 00 means the axle belongs to object 0 (base object).
Base objects can be named just about anything. Above I used aa for the base of the candle switch and cabinet jointed objects.
For the door I used object0.
So for the candle lever and drawers I named the axel to match: @x00aa2500 and for the
door I used @x00ob2500 (ob = the first 2 letters of object0).
And last of all, the elusive 2500. I'm not sure what it's significance is for translating objects and I don't think it really
matters. But for rotating objects it means 90 degrees. 5000 would be about 180 degrees, 9900 would be 360 degrees of rotation. BSP uses this number to determine how
far the joint rotates and if the sub object (handle) will rotate through the base model. That would look very weird in game. Even if you use 2500 it doesn't mean you have
to make the objects handle rotate 90 degrees, that can be set to a different number in Dromed.
Handle names are similar. The s means sub object. 00 is sub object 0, if there are multiple
sub objects they need to be numbered. @s00aa, @s01aa...
Errors:
A Warning: atomic 12a@s00bb cuts 31aa:1 error means that part of the sub object is going to rotate through the base model. It probably also means
that your door will open inwards instead of outwards. Open your .e file and find the 2 coordinates for that sub objects axle:
BEGIN "@z00aa2500"
POINTS{
-1.225335,-2.227996,1.000064;
-1.225335,0.415821,1.000064;
}
Swap the two coords around
BEGIN "@z00aa2500"
POINTS{
-1.225335,0.415821,1.000064;
-1.225335,-2.227996,1.000064;
}
This will change the orientation of rotation. Counter clockwise to clockwise. It has something to do with the order
the axle vertices are created in. It's an easy fix either way. Run the object through BSP.exe again and it should work fine this time.
Extra thanks to Shadowspawn for helping me figure this stuff out.
|